This is a space for topics that I found helpful in building my simulator. It may not all be useful or even correct for those with more experience or knowledge but it helped me enjoy flying more and made a lot of things easier to do.
|
TS2 PRESS to TALK:
Here is how to make TS2 and your joystick play nice together. Using Saitek Profiler and Team Speak 2. In TS2 go to SETTINGS - SOUND. Select "press to talk" and then the SET button. Touch the "Ctrl" button on your keyboard and you'll see "Ctrl" appear above the SET button. No need to SAVE just close the SOUND SETTINGS and go to your Saitek Profiler. Load your profile, Press the key you want to use. I like "Button F". Again press "Ctrl" and the check mark and name it Team Speak Transmit. That's it. Don't forget to save that Profile and ALSO submit that profile to the sim by clicking on the Profile icon in the profiler header. Looks like blue button below on the left. 
The Saitek profiler (1st video above) is quite powerful and a nice 20 min YouTube video by "Froogle" that tells you all about how to do both simple and complex command settings and also correct for latency issues. These methods work pretty much the same for other Saitek hand controllers too like the X-65F etc.
The second video (ABOVE) by EMBEDONIX shows how to use the X-55 SLIDER properly, |
Keyboard Commands, Joy-Sticks and Hot-Key CONFLICTS
One of the most frustrating things in the SIM is having things happen when you don't expect it, like when you go to pull up the flaps and the scene freezes or your TrackIR resets. If you can't figure out what happened and you did not issue the command then you likely have a key setting conflict. When you add new equipment like a Saitek Profiler, TrackIR or MFD ( Multi Function Display) there are likely command settings that are identical in two different pieces of equipment and they are fighting for control. Start by going to the latest piece of equipment you added and ZERO all the commands. Then add them back one at a time and test. Note that other programs that are running including the operating systems can cause conflicts, even Video Display cards like nVIDIA have commands like F12 to Stream live video which are also used by TrackIR to RESET the zero point for your head set. Fortunately, most software allows you to customize special commands and TrackIR does. In TrackIR Advanced Settings, you will see the "Hot Keys" for various Actions. Select each ACTION with the little down arrow and if you mouse over the Hot-Key area below "Key" it will turn yellow. Click it and then enter the new key sequence you want. I've found "AltShift+F12" . . F9 or F7 etc does not seem to conflict with wither FSX, P3D or the Saitek Profiler software. There are 3 other check box to the right so you can disable these hotkeys if you like. The TRAP option traps the command inside the program. It should be CHECKED. If it is UNCHECKED then whenever you hit that key combination it will also be passed to other programs to be executed if set elsewhere. Save that profile and the new Hot-Keys settings will load the next time you start TrackIR, but it only effects THAT profile. Again, anytime you make a change you must click the Profile icon to "push" that setup to the SIM. (See Above LEFT). The other thing to check then is . . . If a SIM command is connected to a particular joystick or MFD button in the SIM command settings page, check to see what the keyboard command is. I always try to use a SIM entry first. So, if SIM button/command is the same as a TrackIR or Profile command then I will change the other programs hotkey first to something else if I can. Then if it cannot be made to work properly I make sure it is blank in the SIM and I program it in the profiler. Note also that if the button sometimes works and sometimes does not it is often the result of something called "Keyboard bounce" . . that is, how long the software has to recognize the button was down. This latency time may need to be adjusted to have the program produce the key DOWN signal for a bit longer time. Fortunately this can be done with a little patience and some help from the Saitek Profiler. |
Getting a GREAT Screenshot!
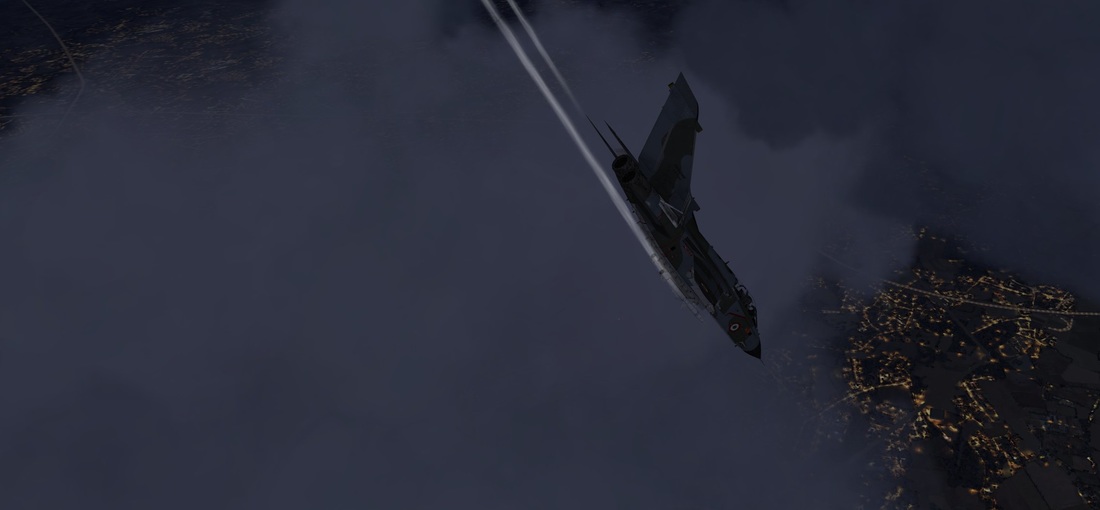
Sometime a great screenshot just happens - right place - right time - Click! That's what happened above with the CF101B Voodoo moon shot. Everything just lined up by chance and I got it. Mostly though, it takes some considerable planning and preparation to make a shot that grabs your attention. Here are some ideas from what I've learned just experimenting. Sometimes when I'm flying I just feel like "This is great . . . there must be a shot here" now or coming up soon so I'll click PAUSE and go outside the aircraft, turn off my TrackIR and move around and zoom in and out till I see it.
Often though, that just shows me I'm coming up to a point where a ground or cloud feature is better framed, or has better lighting or maybe waiting for a lighting strike, so I'll stay outside and UNPAUSE for a few more seconds and then PAUSE again while I switch between other views. The SkunkWorks Tornado is great for capturing low level shots now because it has Terrain Following Radar (TFR). With any other aircraft I always had to be super careful not to fly into the ground waiting too long for just the right moment. Sadly I often waited too long and took a face full of granite or fir trees for the mistake. TFR is super.
This also works well when I've planned a shot, that is only going to happen for a very few seconds, and I'm not quite there yet. I'll PAUSE things before I'm there and assess where the shot is going, and to see how far away I am for a fly-by or the lighting conditions I want. . . . ie coming out from behind a cloud, water reflections or just poking my nose through the terrain.
Then I'll UNPAUSE again and wait to take the shot or simply PAUSE again several times in steps to arrive near the point of interest, like under a bridge or in front of the Eiffel Tower.
There is no simple formula here, but there are several things to consider if you are trying to capture an emotional shot. Those are what photographers call the "money shot". The one you can use for your desktop or to enter a contest. There is a contest coming up if you just got the new PA200 Panavia Tornado from SimSkumWorks. Contest is 1-24 Jan 2016. Take your BEST shots and post them to the SimSkunkWorks Facebook page here there details and contest rules on this page too.
Ideas for just Making it Happen - also check out my samples here for more ideas
1. Pick the Place, Time, Season and Weather you like to fly in and just go fly the PA200. It's the BEST sim model I've ever seen. VERY detailed but no issue with frame rates like many other beautifully detailed models that don't have the sim performance to be smooth flying under detailed display conditions. Many of my best shots have been tooling around in the dark or doing an instrument approach in some nasty weather. Often it's just a happy surprise.
2. I find REX4 Textures with Soft Clouds give me the best weather scenes. Also, Photo REAL scenery especially around Corsica and Rimini are great for mid or high level shots. If you have Bathemetry ON fly around the western shore of Corsica and look at the seashores. . . beautiful opportunities there. I also use FTX2010 mesh with FTX European Land Classes. Be sure to go back and rerun your VectorLC Configurator to give you the best rivers, road and shorelines if you are not using Photo REAL.
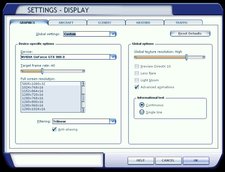
3. Sunrise and sunset have more dramatic lighting, especially in stormy weather . . . or on takeoff or even at FL400. I prefer Light Bloom and Lens Flair UNCHECKED. To me it detracts from the emotion of the shot. (see Display Settings under Global Options.)
4. OPUS real world weather usually has very nice realistic visibility, ie haze, fog or rain along with local cloud structure. It's rarely "Clear and a million" in the real world. REX 4 Essentials + Overdrive is a favorite of mine too for setting up weather.
5. If it's a static ground shot you are after like a ramp area or looking around the corner of a building or through a fence from the parking lot, then go to Display Settings and set the Airport Vehicle Density HIGH as well as LAND and SEA traffic if you around the coast. Static shots can be very dramatic with a lot more detail even if you have a slow computer since frame rates don't matter then. Here's a static example. There is only one change in the aircraft (adding weapons) The rest is all just different lighting angles, distances and zoom. Try different seasons times and heights. If your Tornado is running don't forget to put the lights ON or load some weapons so it looks "Operational". Change the visibility. You may be surprised at how many more great Screen Captures you create. Try using a fence or a really close ground crew perspective for dramatic effect.
Often though, that just shows me I'm coming up to a point where a ground or cloud feature is better framed, or has better lighting or maybe waiting for a lighting strike, so I'll stay outside and UNPAUSE for a few more seconds and then PAUSE again while I switch between other views. The SkunkWorks Tornado is great for capturing low level shots now because it has Terrain Following Radar (TFR). With any other aircraft I always had to be super careful not to fly into the ground waiting too long for just the right moment. Sadly I often waited too long and took a face full of granite or fir trees for the mistake. TFR is super.
This also works well when I've planned a shot, that is only going to happen for a very few seconds, and I'm not quite there yet. I'll PAUSE things before I'm there and assess where the shot is going, and to see how far away I am for a fly-by or the lighting conditions I want. . . . ie coming out from behind a cloud, water reflections or just poking my nose through the terrain.
Then I'll UNPAUSE again and wait to take the shot or simply PAUSE again several times in steps to arrive near the point of interest, like under a bridge or in front of the Eiffel Tower.
There is no simple formula here, but there are several things to consider if you are trying to capture an emotional shot. Those are what photographers call the "money shot". The one you can use for your desktop or to enter a contest. There is a contest coming up if you just got the new PA200 Panavia Tornado from SimSkumWorks. Contest is 1-24 Jan 2016. Take your BEST shots and post them to the SimSkunkWorks Facebook page here there details and contest rules on this page too.
Ideas for just Making it Happen - also check out my samples here for more ideas
1. Pick the Place, Time, Season and Weather you like to fly in and just go fly the PA200. It's the BEST sim model I've ever seen. VERY detailed but no issue with frame rates like many other beautifully detailed models that don't have the sim performance to be smooth flying under detailed display conditions. Many of my best shots have been tooling around in the dark or doing an instrument approach in some nasty weather. Often it's just a happy surprise.
2. I find REX4 Textures with Soft Clouds give me the best weather scenes. Also, Photo REAL scenery especially around Corsica and Rimini are great for mid or high level shots. If you have Bathemetry ON fly around the western shore of Corsica and look at the seashores. . . beautiful opportunities there. I also use FTX2010 mesh with FTX European Land Classes. Be sure to go back and rerun your VectorLC Configurator to give you the best rivers, road and shorelines if you are not using Photo REAL.
3. Sunrise and sunset have more dramatic lighting, especially in stormy weather . . . or on takeoff or even at FL400. I prefer Light Bloom and Lens Flair UNCHECKED. To me it detracts from the emotion of the shot. (see Display Settings under Global Options.)
4. OPUS real world weather usually has very nice realistic visibility, ie haze, fog or rain along with local cloud structure. It's rarely "Clear and a million" in the real world. REX 4 Essentials + Overdrive is a favorite of mine too for setting up weather.
5. If it's a static ground shot you are after like a ramp area or looking around the corner of a building or through a fence from the parking lot, then go to Display Settings and set the Airport Vehicle Density HIGH as well as LAND and SEA traffic if you around the coast. Static shots can be very dramatic with a lot more detail even if you have a slow computer since frame rates don't matter then. Here's a static example. There is only one change in the aircraft (adding weapons) The rest is all just different lighting angles, distances and zoom. Try different seasons times and heights. If your Tornado is running don't forget to put the lights ON or load some weapons so it looks "Operational". Change the visibility. You may be surprised at how many more great Screen Captures you create. Try using a fence or a really close ground crew perspective for dramatic effect.
Here's a lonely shot.

Here's some SPEED!
Ideas for Planning
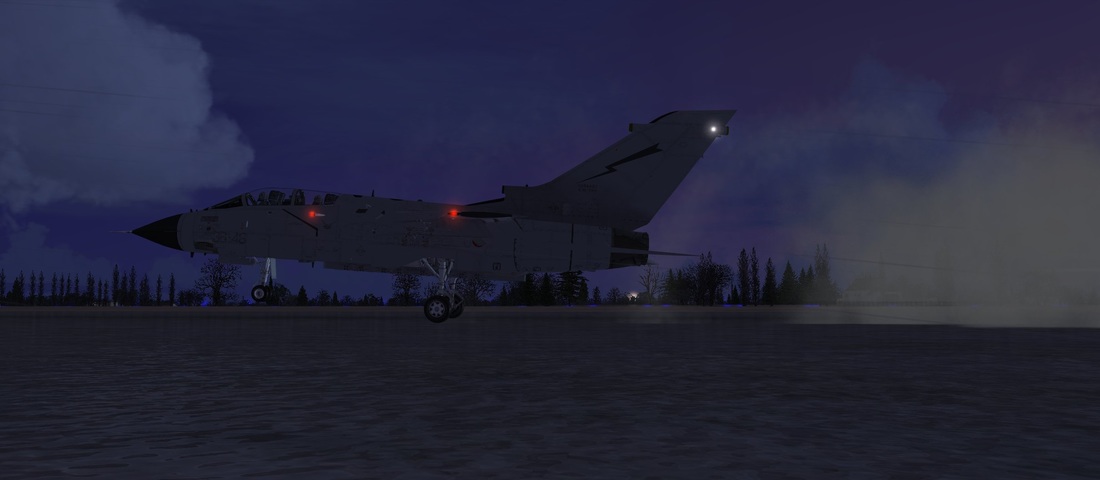
1. Think first . . What kind of thought or emotion do I want to evoke. Emotion SELLS! Power, speed, darkness, loneliness, joy, exhilaration? Each idea brings with it some place and time, some colours and background for the Tornado aircraft to be seen in. If you've ever flown that aircraft for real it should be a lot easier to remember the feeling you had at the time, when and where it was. If you've never been there then imagine it and create your own scenario.
2. Pick a place and time and scenery and weather you want that evokes the feeling you're after. It sometimes helps to think of a point in history or an event like pre-flight with the ground crew or the last time you saw a thunderstorm/lightning while flying. Sometimes I'll go use a simple aircraft like my CF101B and go into the sim with time and season and everything set but switch to SLEW mode and try and place myself near the ground feature . . maybe an airport at night or a castle or clouds and just see what the lighting, ground textures and shadows are like. Then I'll go back and start up the Tornado and fly it back to that location looking for the picture or feeling I have in my head.
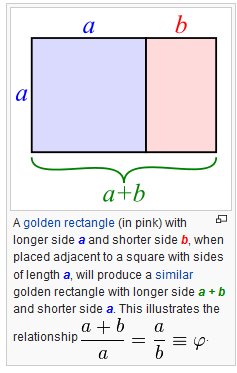
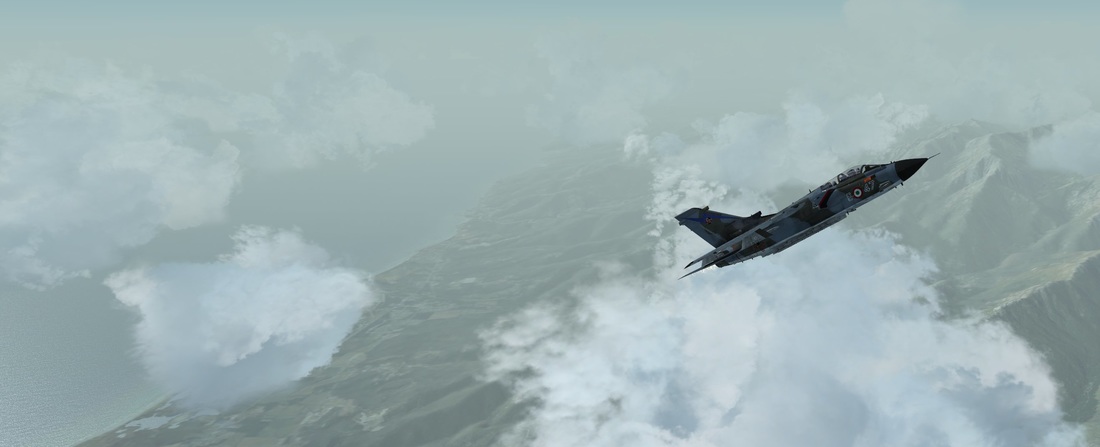
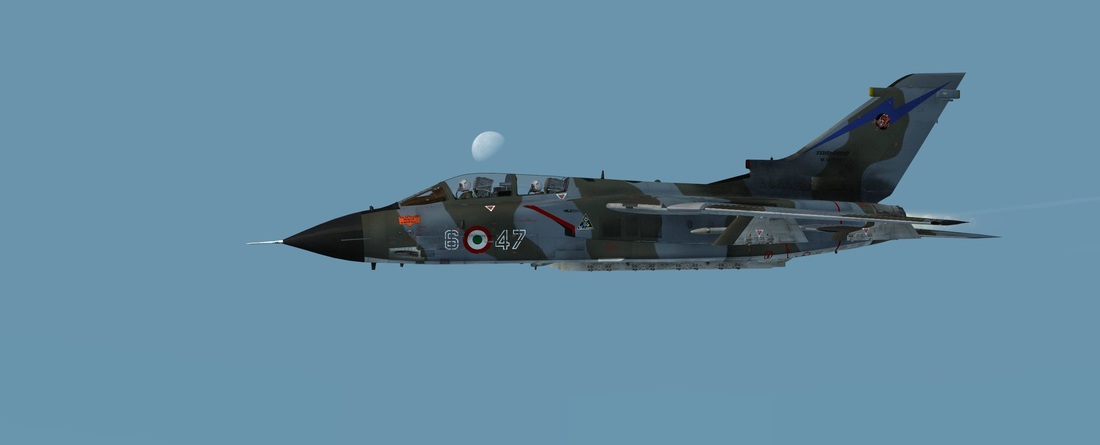
3. Don't place the aircraft in the center of the frame. Use the golden ratio. There is more info here but basically you want the point of interest somewhere in area "b" . . . not always but this is usually more pleasing the the eye than center. Like this Upper photo. If the whole focus IS the aircraft with no background details (Like this lower photo) then golden ratio may not apply.
1. Think first . . What kind of thought or emotion do I want to evoke. Emotion SELLS! Power, speed, darkness, loneliness, joy, exhilaration? Each idea brings with it some place and time, some colours and background for the Tornado aircraft to be seen in. If you've ever flown that aircraft for real it should be a lot easier to remember the feeling you had at the time, when and where it was. If you've never been there then imagine it and create your own scenario.
2. Pick a place and time and scenery and weather you want that evokes the feeling you're after. It sometimes helps to think of a point in history or an event like pre-flight with the ground crew or the last time you saw a thunderstorm/lightning while flying. Sometimes I'll go use a simple aircraft like my CF101B and go into the sim with time and season and everything set but switch to SLEW mode and try and place myself near the ground feature . . maybe an airport at night or a castle or clouds and just see what the lighting, ground textures and shadows are like. Then I'll go back and start up the Tornado and fly it back to that location looking for the picture or feeling I have in my head.
3. Don't place the aircraft in the center of the frame. Use the golden ratio. There is more info here but basically you want the point of interest somewhere in area "b" . . . not always but this is usually more pleasing the the eye than center. Like this Upper photo. If the whole focus IS the aircraft with no background details (Like this lower photo) then golden ratio may not apply.
4. Check your display settings. What Anti-Aliasing are you using? Have a look below with article below this one on Display Settings. Bad anti-aliasing can make the difference on an otherwise great composition. Here's another idea that I've used to work more quickly getting to the final shot. Set your display settings LOW at first. Get the shot all set up and then (in PAUSE) change to HIGH settings with details and try different combinations. More detailed background is always available without reloading and getting airborne again back to the same spot quickly.
5. Takeoff and Landing: If you want to get a nice shot here the tower view zoomed in close often has a dramatic effect with wheel smoke or afterburner effects. Even better is to make place a custom camera right near the threshold of the runway or maybe 3/4 of the way down or maybe even in the middle of the runway to catch the gear transition. There is a great app called EZDok Camera available. . . . It's very powerful but $35USD . . .I think it's great if you want to study cinematography and learn how to make really professional promos. It's an amazing tool . . or for a simple one-time use you can just about as easily hard wire one into your FSX camera.cfg file. Go to this URL and scroll down to EXAMPLE 3 on that page. It tells you how to do that. You just need to SLEW to the location you want and write down the LAT LONG and Altitude visible with SHIFT Z Then just edit your camera.cfg file in a text editor by following Example 3. You will also need to generate and unique GUID for the camera but that's pretty easy too. Click HERE. Place a camera by the end of a runway, side of a mountain or even the top of a building, bridge or tower. Virtually anywhere. |
PS. Lots of great sim pilots out there will be submitting some awesome views of the new PA200 Tornado in Jan 2016. You should do it too! . .
|

Anti-Aliasing Options - What Difference Does it make?
With FXAA and MSAA options plus 4 options or more for each there are some 40 combinations of AA selections to apply but it only comes down to what you like . . so to help you maybe I've done some of the work by taking screen shots you can compare. You system may respond differently if you are using a different Graphics Display card ( I'm using ASUS GTX980 with4 Gig memory)
Bottom line for me is a good balance between visual perception of smooth curves and angles with minimum frame rate impact. For my configuration I settled for FXAA ON with either Trilinear or Ansiotopic 4x and MSAA ON with 4 samples selected. Check out this comparison in the slide show below and then see how your system does with similar settings. Display Settings is a BIG topic. A broader discussion of the topic is below this article.
Bottom line for me is a good balance between visual perception of smooth curves and angles with minimum frame rate impact. For my configuration I settled for FXAA ON with either Trilinear or Ansiotopic 4x and MSAA ON with 4 samples selected. Check out this comparison in the slide show below and then see how your system does with similar settings. Display Settings is a BIG topic. A broader discussion of the topic is below this article.
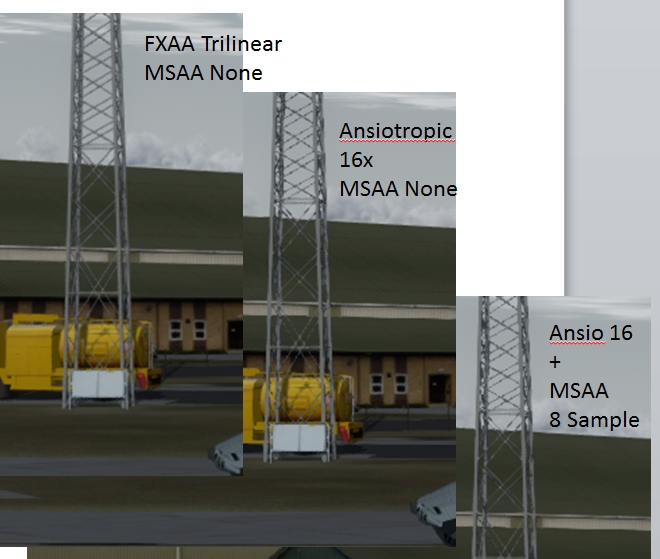
Here's another example: This first image is with FXAA OFF and MSAA None
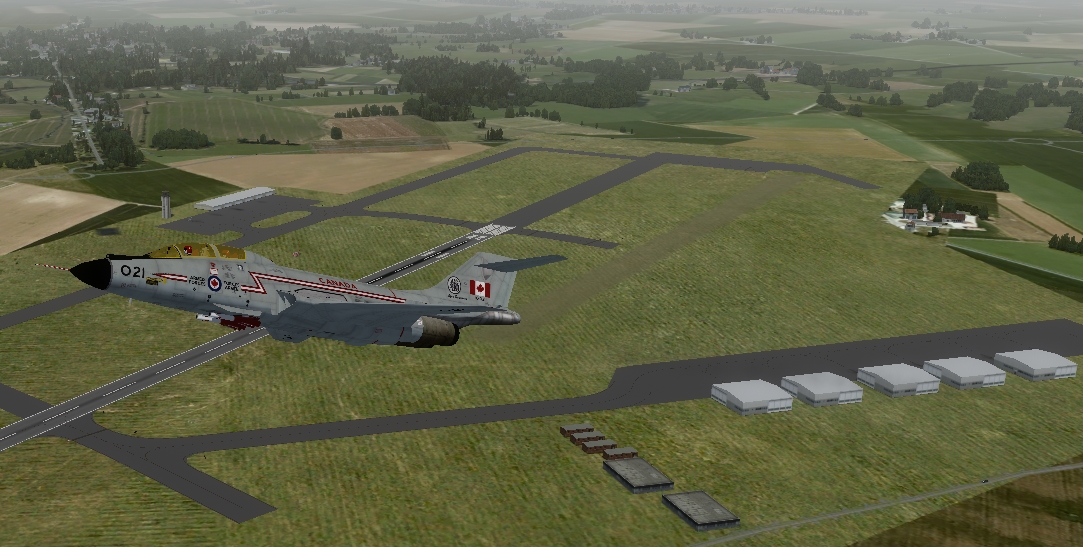
The 2nd image uses Trilinear ONLY - NO MSAA It does help but still the runway white lines and the red stripe on the Voodoo is jaggy. No noticeable frame rate loss
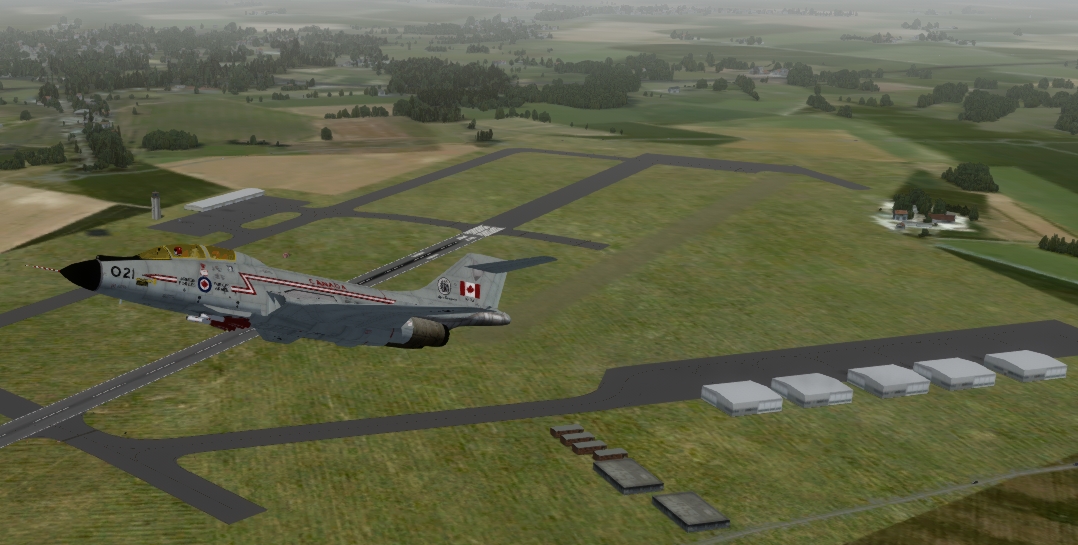
The 3rd view uses FXAA with Ansiotropic 4x and No MSAA still not much better than Trilinear. High contrast boundaries like white against red or black seem to be the most obvious
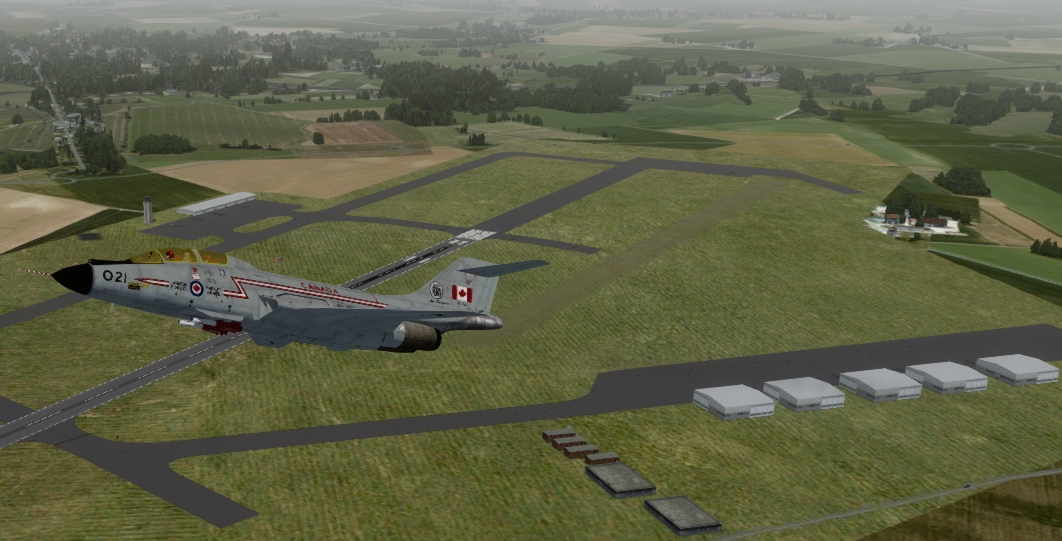
Finally, even with Ansiotropic 16x seem to add nothing - the 5 grey hangars on the right look better against the darker ramp area but the white painted on runways are still not smooth. Again I could not notice any significant loss of frame rates. Only after adding MSAA 4 Sample was there a 2-3 fps loss. .. so my preferred setting now is FXAA Ansio4x with MSAA 4 Samples.

P3D/FSX Display Settings - Why should I choose one setting or the other?
Last weekend my son Jeramy visited from Seattle and showed me what to do to optimize my sim performance. He has 20+yrs experience in gaming and knows waaaaay more than I ever will about pixels, shaders, buffers and anti aliasing etc. It took him about 10 min to go through P3D options and optimize my settings . . . Now I'm getting more consistent frame rates, lots of detail, smoother flying and more fun. He also explained a lot in the process. Here is what I learned.
Every system is different but they all operate in essentially the same way. The program determines what is in the scene and then the scene is rendered based on position, lighting, the velocity of objects to be displayed. The graphics card then modifies a bunch of textures to place them in view at the right place and orientation to make the scene appear real. In the process it has to manipulate those billions of bits . . sometimes many times . . to achieve the desired look. What works for my configuration may not be best for yours but knowing some basics can help you understand what is important for smooth realism and what is NOT helping the eye candy and instead just killing your frame rates. I have a pretty powerful system but no where near the fastest processor and graphics card that are available. When you choose settings they can be general or specific to the type of flying you are doing and each configuration will have compromises. You need to tune it to your equipment as well as HOW you use it. . . like I now will turn off certain things if I'm doing a low level mission over water or go to higher resolution on lighting or shadows for a night IFR flight.
I use 3 screens so this adds a substantial cost in processing and lower frame rates over a single monitor, but what I am suggesting here is simply a better understanding of graphic display methods so you can decide yourself how to optimize your system for the type of flying you do. If you want, just got to the bottom of this article and load the "Base Settings" I have, then adjust your settings from there . . . or you can read through this for a better understanding of why you would choose one or another of the dozens of options available. This is not a one size fits all description and I'm sure I did not understand everything he described but my visuals are way smoother than ever before.
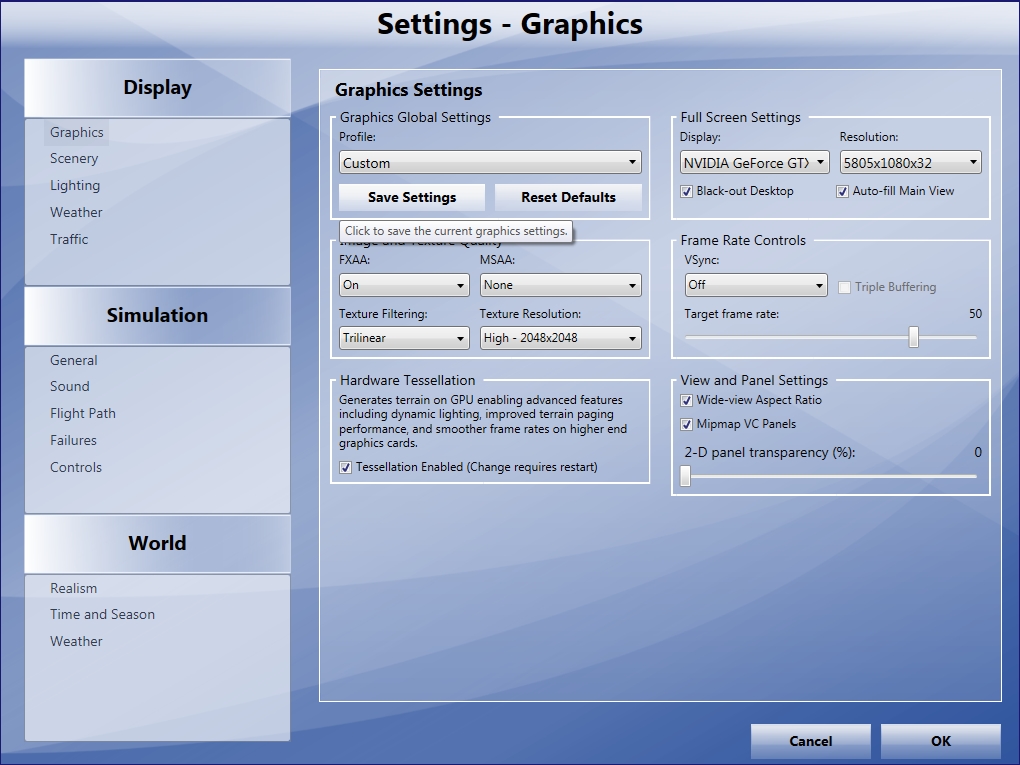
Settings - Graphics
Jeramy noted that the nvidia Inspector is for primarily the programmers and pros who really understand graphics card architecture and how all the bits, frames, pipelines and shaders are manipulated internally. Inspector settings can often conflict with the game setting within FSX or P3D, so his advice was "best not use Inspector and make all your display setting within P3D or FSX".
In Frame Rate Controls VSync should be OFF. The VSync Feature helps the program redraw scenes at a rate compatible with your monitor latency. Most monitors can adjust automatically with only the occasional screen tear. Triple buffering is just what it says. It runs pixels through a buffer 3 times before it gets displayed to your screen. This slows down the processor and not using it leaves more cycles for normal screen rendering. Here is a related tip from Zach Heylmun of P3D.
One thing to keep in mind is that the v-sync is adaptive. Assuming you have a 60hz monitor, enabling v-sync will lock your frame-rate to 60, 30, 20, 15, etc. If you enable v-sync and set your frame limiter to exactly 30 you will artificially introduce stutters by dropping to 20hz for any frame that runs long. I would try locking the frame-rate slightly above 30hz so that frames which run slightly long don't cause a stutter. Enabling triple buffering with the frame-rate locked about 10% higher than the desired refresh rate tends to give very smooth results.
Zach Heylmun
PREPAR3D Software Engineer
First off, anti-aliasing is way overdone by most simmers and the actual improvement of the visual effect you get in FSX or P3D is not worth the processor being bogged down by it. In the DISPLAY menu there is FXAA and MSAA. FX anti-aliasing is hardware based and Multi Sampling AA is done by software. Everyone likes to up the MSAA using "ansiotropic" 4x or higher. All this does is cause the program to go over and over the hardware FXAA result with VERY minor improvements in smoothing the edges of object in the scene. Suggest NONE to start with.
The program picks textures needed for the current field of view to render the scene. Then it passes it through a filter that changes what the surface texture will look like when displayed at an oblique angle under current lighting conditions and ansiotropic filtering can go through this process several times to try again and again to smooth things out. This all takes a lot of the processing power. Make a screen shot of the same scenery with both settings and you will see very little, if any, noticeable different in the line smoothness over trilinear AA. . . and you will save a lot of wasted processor time but still have a realistic scene. There are differences but to me they favor Trilinear.
Multi Sampling AA in software will likewise use a lot of software processing to achieve a finer AA result on oblique or curved surfaces. I cannot really notice when it is super-sampling 2x or 4x so Jeramy suggested NONE and my frame rates were even better.
Here is what I mean . . angles and fine details are what you want to smooth out with anti aliasing. . . look at the fine cross members of the tower to see how FXAA and MSAA setting smooth things. I like the FXAA Trilinear and MSAA None.
Every system is different but they all operate in essentially the same way. The program determines what is in the scene and then the scene is rendered based on position, lighting, the velocity of objects to be displayed. The graphics card then modifies a bunch of textures to place them in view at the right place and orientation to make the scene appear real. In the process it has to manipulate those billions of bits . . sometimes many times . . to achieve the desired look. What works for my configuration may not be best for yours but knowing some basics can help you understand what is important for smooth realism and what is NOT helping the eye candy and instead just killing your frame rates. I have a pretty powerful system but no where near the fastest processor and graphics card that are available. When you choose settings they can be general or specific to the type of flying you are doing and each configuration will have compromises. You need to tune it to your equipment as well as HOW you use it. . . like I now will turn off certain things if I'm doing a low level mission over water or go to higher resolution on lighting or shadows for a night IFR flight.
I use 3 screens so this adds a substantial cost in processing and lower frame rates over a single monitor, but what I am suggesting here is simply a better understanding of graphic display methods so you can decide yourself how to optimize your system for the type of flying you do. If you want, just got to the bottom of this article and load the "Base Settings" I have, then adjust your settings from there . . . or you can read through this for a better understanding of why you would choose one or another of the dozens of options available. This is not a one size fits all description and I'm sure I did not understand everything he described but my visuals are way smoother than ever before.
Settings - Graphics
Jeramy noted that the nvidia Inspector is for primarily the programmers and pros who really understand graphics card architecture and how all the bits, frames, pipelines and shaders are manipulated internally. Inspector settings can often conflict with the game setting within FSX or P3D, so his advice was "best not use Inspector and make all your display setting within P3D or FSX".
In Frame Rate Controls VSync should be OFF. The VSync Feature helps the program redraw scenes at a rate compatible with your monitor latency. Most monitors can adjust automatically with only the occasional screen tear. Triple buffering is just what it says. It runs pixels through a buffer 3 times before it gets displayed to your screen. This slows down the processor and not using it leaves more cycles for normal screen rendering. Here is a related tip from Zach Heylmun of P3D.
One thing to keep in mind is that the v-sync is adaptive. Assuming you have a 60hz monitor, enabling v-sync will lock your frame-rate to 60, 30, 20, 15, etc. If you enable v-sync and set your frame limiter to exactly 30 you will artificially introduce stutters by dropping to 20hz for any frame that runs long. I would try locking the frame-rate slightly above 30hz so that frames which run slightly long don't cause a stutter. Enabling triple buffering with the frame-rate locked about 10% higher than the desired refresh rate tends to give very smooth results.
Zach Heylmun
PREPAR3D Software Engineer
First off, anti-aliasing is way overdone by most simmers and the actual improvement of the visual effect you get in FSX or P3D is not worth the processor being bogged down by it. In the DISPLAY menu there is FXAA and MSAA. FX anti-aliasing is hardware based and Multi Sampling AA is done by software. Everyone likes to up the MSAA using "ansiotropic" 4x or higher. All this does is cause the program to go over and over the hardware FXAA result with VERY minor improvements in smoothing the edges of object in the scene. Suggest NONE to start with.
The program picks textures needed for the current field of view to render the scene. Then it passes it through a filter that changes what the surface texture will look like when displayed at an oblique angle under current lighting conditions and ansiotropic filtering can go through this process several times to try again and again to smooth things out. This all takes a lot of the processing power. Make a screen shot of the same scenery with both settings and you will see very little, if any, noticeable different in the line smoothness over trilinear AA. . . and you will save a lot of wasted processor time but still have a realistic scene. There are differences but to me they favor Trilinear.
Multi Sampling AA in software will likewise use a lot of software processing to achieve a finer AA result on oblique or curved surfaces. I cannot really notice when it is super-sampling 2x or 4x so Jeramy suggested NONE and my frame rates were even better.
Here is what I mean . . angles and fine details are what you want to smooth out with anti aliasing. . . look at the fine cross members of the tower to see how FXAA and MSAA setting smooth things. I like the FXAA Trilinear and MSAA None.
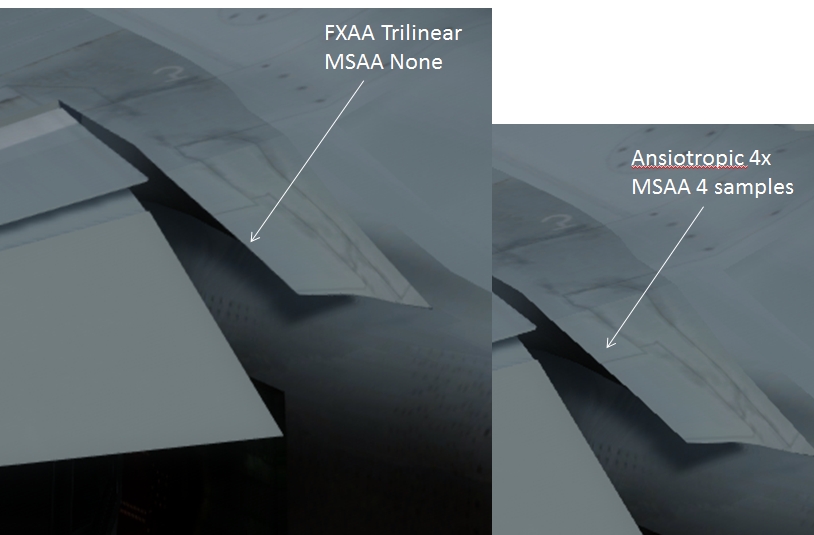
Have a close look at this Harrier wing . . I see the trilinear with no MSAA gives the smoothest results
If you have lots of graphics card memory . . like 4Gig or more . . then Texture resolution of 2048 x 2048 is fine. If you have only 2Gig then 1024 x 1024 will prevent the graphics processor from running out of memory and choking or hesitating.
Hardware tessellation is sort of explained on the setting screen but leave it checked and then adjust the amount of tessellation in the Scenery Settings screen. The tessellation engine is hardware that creates progressively finer topography details for each texture being displayed so that more visual details appear on terrain and objects. On fixed objects it is less processor load than on dynamically moving objects like water because the constantly changing angles produce dynamic lighting and reflection differences and each finer resolution takes exponentially more rendering time and slows fps.
I used to always set my Target Frame Rate to 30 but Jeramy suggested 50 so that when the scenes are demanding a lot of redrawing from the system it may still be able to maintain at least 25-30 fps under load. The overhead is there to absorb all the redrawing and as Zach said it can help the monitor to adapt to the frame rate . . he recommended only 10% over like 33fps.
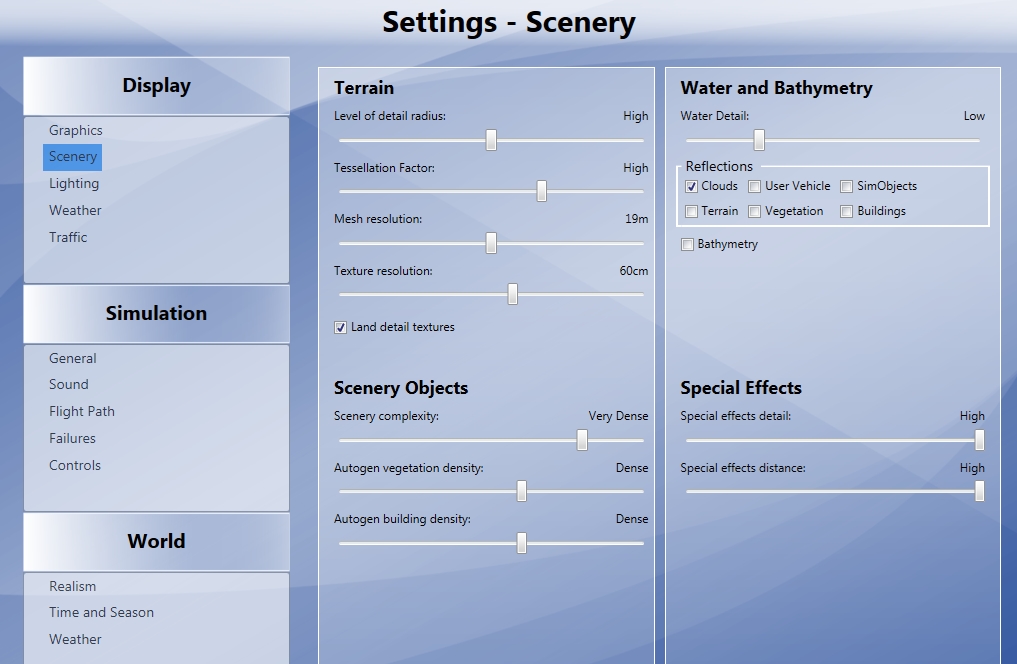
Settings - Scenery
I've set my base settings pretty much in the middle as well as scenery complexity. . . but I normally fly with terrain and scenery sliders more to the right. Here is where you should first experiment with your system's use of Tessellation. Start Tessellation all the way left (LOW) and fly in some clear skies. Check out taxiing around in an airport with lots of objects. Try flying over large cities or over photoreal scenery or larger forested areas at low level and you will see what you system is capable of. Then move it further right until you are happy with the scenery and still holding the frame rate that's smooth and not jumping up or down too much. If it is jumping or the terrain is moving in chunks or jerking then set your radius smaller or lower the complexity until it smooths out.
Unless I'm flying over water a lot I keep water detail I keep low with only cloud reflections. (Bathymetry NOT checked) I think that is just for underwater effects anyway. If I'm planning to fly over a lot of water then I move everything to the right and check all reflections but only if I have fairly clear weather. Using water reflection effects with lots of cloud and weather is not realistic anyway.
On Terrain I always leave land detail textures CHECKED but set tessellation High or better. Level of detail radius is only really important if I'm low level at high speed and using a lot of autogen building and vegetation. If you want more detailed scenery then keep the radius lower so it has more time to draw the stuff you can see nearby. If you push the radius to MAX and tessellation to ULTRA you will make the processor draw and anti-alias a ton of stuff you will never see more than a few pixels of.
Scenery Objects is a frame killer but I find DENSE is usually enough to populate a scene for realism. I have not done a lot of experimenting with special effects but they do not seem to add a lot of processing overhead so I leave them both at HIGH. I do use the Global FTX2010 mesh and textures and they make a lot of difference in realistic ground textures. They are much better than the stock textures at blending roads and rivers and ground features when used with OrbxFTX and FTX Vector. These add-ons are well worth the price for ground realism. . . . as is REX4 textures with SoftClouds. . . preferred over the stock textures that come with FTX or P3D.
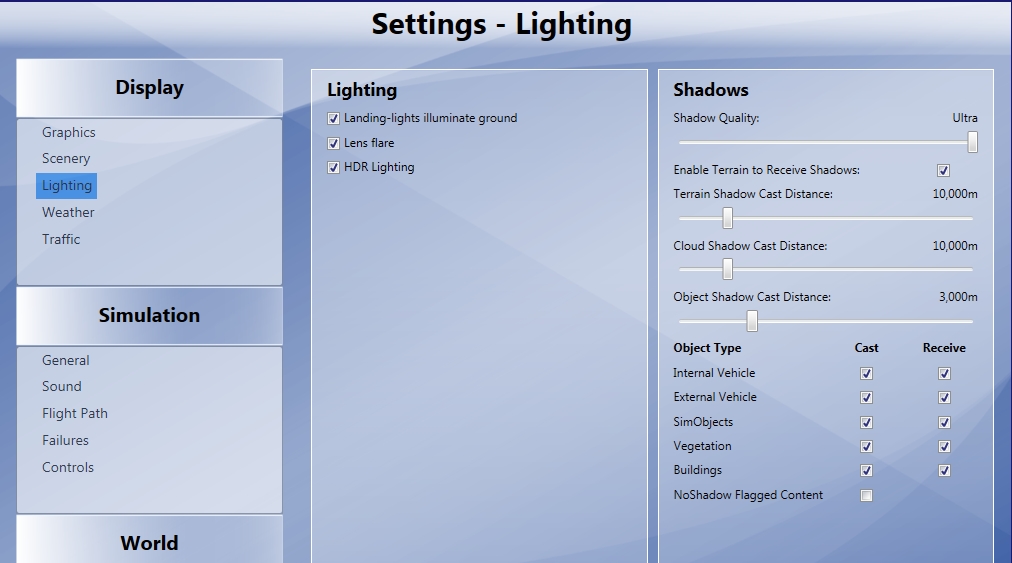
Settings - Lighting
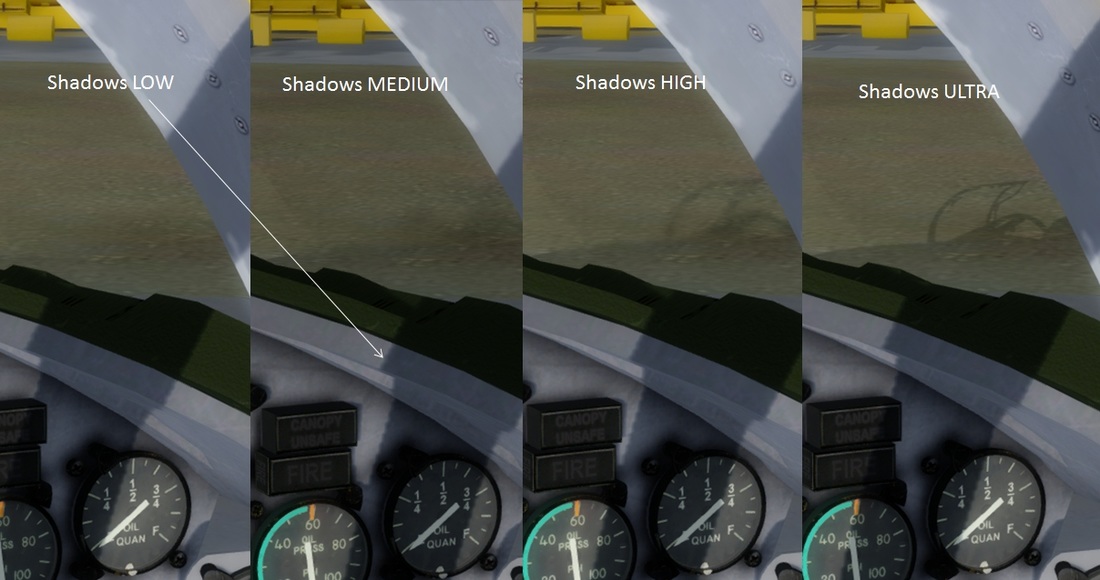
I like shadows for realism . . so I keep shadow quality at ULTRA and use the first level of shadow cast distances but I check all the Cast and Receive. Note that it seems shadows inside the cockpit (white arrow) are not significantly better under ULTRA Setting compared to the canopy shadows on the ramp outside. This would suggest if you are flying IFR especially in low light and heavy weather you should set shadows quality to LOW. You'll never notice and your fps will improve especially in multi-player.
Hardware tessellation is sort of explained on the setting screen but leave it checked and then adjust the amount of tessellation in the Scenery Settings screen. The tessellation engine is hardware that creates progressively finer topography details for each texture being displayed so that more visual details appear on terrain and objects. On fixed objects it is less processor load than on dynamically moving objects like water because the constantly changing angles produce dynamic lighting and reflection differences and each finer resolution takes exponentially more rendering time and slows fps.
I used to always set my Target Frame Rate to 30 but Jeramy suggested 50 so that when the scenes are demanding a lot of redrawing from the system it may still be able to maintain at least 25-30 fps under load. The overhead is there to absorb all the redrawing and as Zach said it can help the monitor to adapt to the frame rate . . he recommended only 10% over like 33fps.
Settings - Scenery
I've set my base settings pretty much in the middle as well as scenery complexity. . . but I normally fly with terrain and scenery sliders more to the right. Here is where you should first experiment with your system's use of Tessellation. Start Tessellation all the way left (LOW) and fly in some clear skies. Check out taxiing around in an airport with lots of objects. Try flying over large cities or over photoreal scenery or larger forested areas at low level and you will see what you system is capable of. Then move it further right until you are happy with the scenery and still holding the frame rate that's smooth and not jumping up or down too much. If it is jumping or the terrain is moving in chunks or jerking then set your radius smaller or lower the complexity until it smooths out.
Unless I'm flying over water a lot I keep water detail I keep low with only cloud reflections. (Bathymetry NOT checked) I think that is just for underwater effects anyway. If I'm planning to fly over a lot of water then I move everything to the right and check all reflections but only if I have fairly clear weather. Using water reflection effects with lots of cloud and weather is not realistic anyway.
On Terrain I always leave land detail textures CHECKED but set tessellation High or better. Level of detail radius is only really important if I'm low level at high speed and using a lot of autogen building and vegetation. If you want more detailed scenery then keep the radius lower so it has more time to draw the stuff you can see nearby. If you push the radius to MAX and tessellation to ULTRA you will make the processor draw and anti-alias a ton of stuff you will never see more than a few pixels of.
Scenery Objects is a frame killer but I find DENSE is usually enough to populate a scene for realism. I have not done a lot of experimenting with special effects but they do not seem to add a lot of processing overhead so I leave them both at HIGH. I do use the Global FTX2010 mesh and textures and they make a lot of difference in realistic ground textures. They are much better than the stock textures at blending roads and rivers and ground features when used with OrbxFTX and FTX Vector. These add-ons are well worth the price for ground realism. . . . as is REX4 textures with SoftClouds. . . preferred over the stock textures that come with FTX or P3D.
Settings - Lighting
I like shadows for realism . . so I keep shadow quality at ULTRA and use the first level of shadow cast distances but I check all the Cast and Receive. Note that it seems shadows inside the cockpit (white arrow) are not significantly better under ULTRA Setting compared to the canopy shadows on the ramp outside. This would suggest if you are flying IFR especially in low light and heavy weather you should set shadows quality to LOW. You'll never notice and your fps will improve especially in multi-player.
My Base Settings for the 3 main areas in P3D :There are 3 main setting screens shown below that effect the smoothness and realism of the simulation. I use this as my BASE settings and then adjust them occasionally. For example, if I'm flying over a lot of water at low level or mostly in the clouds or maybe different again if I'm using complex weather in a multi-player environment. If I am doing a lot of formation flying I will keep all my ground textures and water detail low. I will up the shadows and lower the scenery complexity. This give me much smoother results trying to keep up and not over control.